Panoform – Explore Your Own Sketches In Virtual Reality With Simple Materials
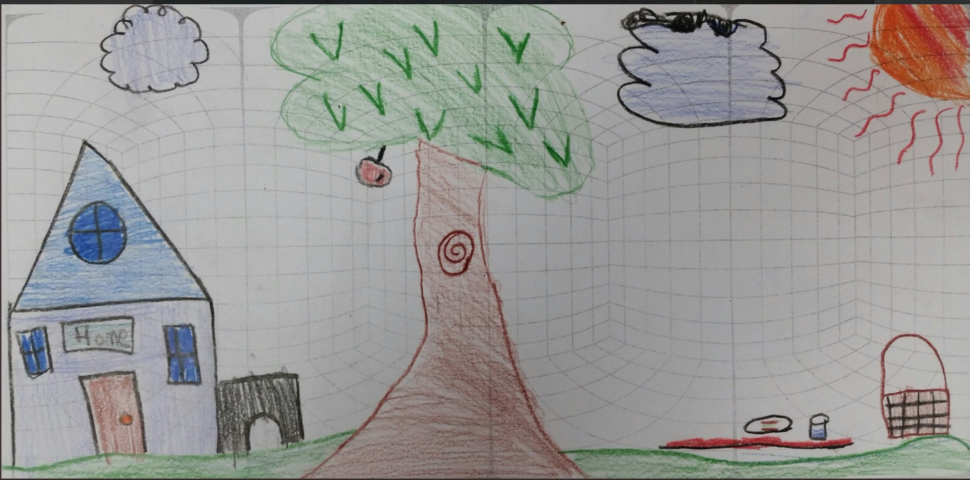
Panoform example from a STEM club by Justin Johnson, Twitter profile @MrJohnson5th
My introduction to Panoform for creating virtual reality was through an AACE Review article on the Making Workshop at EdMedia 2018. This article shares our experiments in an informal learning setting.
The Panoform website describes the intention of Panoform as “virtual reality for everyone”. The idea of being able to step into my own drawing using just three items, “crayons, paper and a mobile device” was a compelling invitation.
Optionally, and to really experience the VR aspect, you need a fourth item, some sort of VR viewer. This can be a simple Google Cardboard viewer or a VR headset. To use the Panoform Tool your mobile needs to be able to access the internet, as Panoform is accessed in the browser.
In our explorations, we were using Google Cardboard viewer and an iPhone SE.
Our experiments: Making your drawing come to life
There are simple steps to transforming your drawing into a walk around world using Panoform. These were our steps:
- Print out the grid onto paper from the Panoform website
- Sketch anything on to the grid paper
- Take a photograph of your drawing with a mobile device
- Browse the online Panoform Tool on your device
- Upload your drawing to the Panoform Tool
- Tap the VR icon
- Insert your phone into a VR viewer
- Look around and exclaim at how cool it is to see your art all around you!
Printing the grid
At first, we weren’t sure where exactly to draw on the grid, but looking at a few examples on the website, gave us some clues. Also, having a look at the @Panoform twitter feed yielded lots of visual tips from others for getting it right. We decided to just experiment and learn! This is a great feature about Panoform as you can simply print more grids.
Drawing on the grid
I was using Panoform with children from age 5 to 8 and drawing on the grid didn’t pose any problems. I tried at first to explain how the grid would work in the viewer, but I think simply experiencing the VR hands-on is a better way to explain it.
Take a photo of your drawing
This was easy to achieve, and we initially spent time trimming our edges from photos. We then tried a few with less accuracy and the 3D effect was still just as good. Some drawings had very light lines that didn’t emerge well in the photograph and we had a few glitches and experiences of mashed up drawings, but this was all part of our experimentation.
Uploading to the website
We had a few questions during the process of uploading our drawing about how public the image would be, as there is a gallery on the Panoform website. It was refreshing not having to install anything before our session, as you simply use a browser.
Retrofitting a grid onto existing art
You can do this by making the Panoform grid layer transparent, using any drawing software that supports layers (we use free FireAlpaca and MediBang Paint). We tried with some existing drawings that hadn’t been drawn with 3D in mind and our first experiments yielded mixed results. We need a little more experimenting to get this technique right.
The VR experience
Just on a mobile device screen alone, you can get an idea of the VR experience and so crayons, paper and a mobile device really are the base toolkit here. I really like this about the tool because it as a play motivated concept, it gives everyone with a device the chance to experience. We were keen to test Google Cardboard as it’s the viewer I already had. The VR viewer is optional, but I would l would recommend it.
Up front I will mention that personally I experience trouble viewing virtual reality. I have a balance/vertigo disorder and as much as I love the technology, fully immersive VR headsets cannot be a friend of mine based on past experiences. So I was really curious about whether this would be an accessible VR experience for me. I had no problems using Google Cardboard to view drawings in this form of VR and I hope this will encourage others to try, too.
You can imagine that the immersiveness of VR in a headset is probably where Panoform would really exciting, but as we don’t have access, we didn’t test this. Google Cardboard was perfect, and it was also simple for the kids to use.
Once the children had tested their first drawings, there were some great questions about how to draw rooms and whether each rectangle region was a wall and which wall. I think it’s a great step into thinking about drawing perspectives as there is motivation to be able to “see” around in their art.
Now your turn to explore!
Based on our small experiments, we have lots of ideas about how to use this for fun. It’s also easy to imagine the next steps in creating intentional 3D traversable educational sketches and diagrams. Panoform is a great tool to add to your STEAM Makerspace as a short activity to explore low stakes VR. You could have pre-printed grid paper and students could experiment with a range of drawing techniques, very quickly jumping into experiencing those drawings immersively.
I’ll be taking Panoform out and about a lot more into our Code Clubs, as it’s easy, fun and a way for kids not just to see VR, but to make their own VR experiences.
If you are looking for more ideas on how to use Panoform, don’t miss the second part of our ‘virtual reality for everyone’ series: An Interview with Greg Garner from Panoform.
Further Resources
- Derek Hams – Play + Learn + Design
- Payod Panda – Panoform Democratizing VR creation with a low-fidelity, hands-on making tool.
- Miguel Guhlin – Wallpaper your 3D Virtual Room with Panoform
